Showing posts with label Altered objects. Show all posts

Friday, 22 August 2014

More Storage

I saw an Ikea box on the DoCrafts website that had been decorated with the Roald Dahl papers, and thought that these might be an ideal addition to my classroom for next year.


I picked up a set of the Ultimate Die-cut pack and the cute trims, along with the drawers themselves to make my child friendly storage.

After a coat of white emulsion paint I covered the whole box with various papers, choosing different ones for each drawer.

 I then added flat decoupage and a few trims and ribbons.  A final coat or two of matt varnish makes my furniture ready to withstand the wear of the coming year.

Wednesday, 19 February 2014

New Baby

One of my colleagues from work who is currently on maternity leave is coming over to see me today.  She's bringing her little boy with her, and I can't wait to see them both.


As I'm still not deemed fit to drive by the DVLA due to last year's health problems I haven't been able to get over and see them, so am looking forward to giving them the gift I made, and the card.
I stamped the card using a Unity set, and first and second generation stamping, with a little water colouring to complete the image.

Friday, 30 August 2013

Inspired

Well, I did manage to pick up my lovely paper pack, and had a morning being inspired by Tim Holtz.

He is a really good teacher, well prepared and explained everything a step at a time.  i came away knowing how to make better use of the ranger things I already have, and with an almost completed vintage mini book about my ancestors.  I then spent the afternoon completing my book, and here it is in all its glory!

The cover has the lumpiest embellishments and a belt style fastening.

Inside I used little photos of family members, flip up pages added to embellishment spaces.

Some mini pages flipped left to richt, hinges were made with tissue tape.

Backgrounds were made using distress stain, inks and masks.

Strange to think it stared as a little bag of ribbon and embellishments and a handful of manilla tags.
I even chopped into my new papers for the final pages with a photo of me to include some science references!
I'm not one to gush, but I did come away feeling inspired, and thinking about using my stash in a new way!

Sunday, 15 July 2012

Happy Days are here again!

We've had a lovely time in Nuneaton out with Mum and Dad as it was President's Day at the bowls club there.  Dad has been a member for many years, and was elected President this year, so it was his special day today.

I managed to get lots of great photos of him playing, and it stayed dry too!


In celebration, here is a set of bunting I made using the Happy Days papers that appeared in the Creativity magazine.

 End of term; 7 working days and counting........

Tuesday, 6 September 2011

A Wedding Gift

I didn't give Michelle and Rich a gift on the day of their wedding, but waited to take some photos and made them an altered canvas as a present.

The canvas was a very inexpensive one (think pound shop!)
and I started by simple obliterating the original design using a couple of coats of acrylic paint. The design around the edges was stamped using a Martha Stewart Stamp around the page set, then I stamped the edges of the canvas too with various words.
One of the reasons I love canvases is that I don't have to worry about the 3D parts getting squashed, or about keeping to the size so they fit in a scrapbook. With this in mind I went a bit mad with Amy Butler papers and a few Sizzix dies to make the flowers, swirls and journalling block.
The swirl top left is grungeboard, inked
and then heat embossed with a glittery embossing powder.
I added an old Making Memories metal book plate some Beadazzles to the flowers, attached everything with a hot glue gun for longevity, job done!

I'm glad to say they both really loved it :)

Supplies;
Acrylic paint cream
Sizzix dies Extended dies: Swirl, Antique Market alphabet: rosette flowers (small).
Sizzix Bigz die Tattered Florals
Nestabilities Label 1.
Martha Stewart Stamp around the page.
Tim Holtz grungeboard swirl.
Ink Stampin' Up turquoise.
Beadazzles Silver


First day back at work with the kids done.... they were really well behaved and hard working... long may it last :D

Sunday, 19 September 2010

She's flown....

..the nest that is. We spent yesterday in Derby with Hannah, she has a lovely room in her Halls of Residence flat (and I'll choose to forget the pervading smell of vomit outside the buildings.... students, hey?) and is very lucky to have the biggest bedroom in the flat. We had a lovely time in the centre of Derby, and even found that her nearest supermarket is an Aldi.. home from home!! I made her this using a bargain plain notebook from The Works, a Sizzix alphabet die and my Bind it All machine. She is a good cook, but I made some dividers form pink card to separate the different types of cooking, and wrote in some of my favourite recipes. Her Dad, Grandma Joan and her Aunty La also added recipes, and there is plenty of space for her to write in her favourite things to cook as she goes along.


....Only thing is she forgot to pack it!!! It was left out until the last minute as my Mum added another recipe, so I'll have to post a little package to her!


Out crafting today, hope to get some pages done as I have loads of photos from this summer to deal with.

Thursday, 9 September 2010

Altered birdhouse.

It's taken me ages to get around to posting about this cute little thing I made at the Exhall crop back in June (designed by Rebekah Brumby), mainly because I had taken photos of it, uploaded these onto my PC, and then couldn't find them. .... How many others does this happen to "I know I have a photo of xyz, but I can't find them...."

The birdhouse itself was bare MDF, we covered it with papers cut using the house as a template. I love the roof covering with buttons, the notice on the front was made using a piece of an old corrugated box, stamped (Prima), cut out, I inked and tore mine too, and added some brads and a ribbon to hang the sign. The bird is chipboard covered in UTEE in the melt pot, and the flowers are fabric. it sits nicely on the dresser in my kitchen... Hannah has been trying to pinch it to take away with her as she likes it, but I've said no!!!


The only thing I don't like about it is the fact that it is empty :(


Friday tomorrow, and as Katie did so well in her science exams (A*'s !!!!) we'll be out for pizza, any excuse really!

Monday, 17 May 2010

It's amazing....

...what you can make with a picture from an old magazine, a few scraps of fabric and lace, left over wallpaper, beads, sequins and a sewing machine. At the Nuneaton crop yesterday Pam and Michelle shared what they learned at a class at the NEC recently, and we all had a great time learning new skills and making lovely things to go onto scrapbook pages, or to use in their own right. My memo book cover started as two photos in a magazine (you can just see the picture behind the buttons, they gave the inspiration for the colours I chose) some organza fabric torn into strips and scraps of paper. I sewed these onto the pictures (after reinforcing the back with iron on interfacing) using a variety of sewing machine stitches. I then hand stitched on the flowers, sequins and beads, and finally bound the upper edges with ribbon. A few folds, and a piece of left over ribbon for the tie, and i have a cover for my shopping list book, which slides into a pocket inside the cover. Something unique, pretty and useful!


More inspectors in school tomorrow, as i work in a catholic school, the RE inspection is an added bonus for us all!!!


Monday, 14 September 2009

Back to School

Hannah decided this year that she would use books to take her notes for her A level studies. So i was sent out last week to look for some spiral bound A4 books. I found these at a fab price in Aldi (£4.99 for 3 books) so i bought her two sets... but they are very dull.


So an hour or so later after playing with stamps, embossing powder and a heat gun this is what we came up with.


The triple embossing was Hannah's idea, and it was nice to look through my Unity stamps, and put them to good use.


Still no secondary jobs about. I have seen two primary teachers posts, but as i have only taught older students, am not sure i would even get a look in.

Saturday, 20 June 2009

Altered art...

I was puzzling over what to get my sister for her birthday next week, when i saw these canvases at the knock down price of £1.99 in The Range last week. I had an idea of what to do with them, and after a lot of effort (and very inky fingers....!)


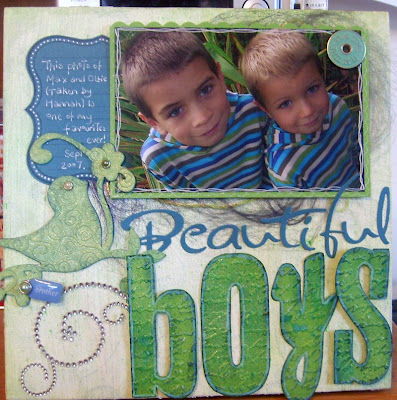


...... i made an altered canvas for her for the first time... this is how i did it......


1. Use white acrylic paint and a small amount of brown to cover the original canvas. Leave to dry... i speeded this up with a heat gun.


2. Using Tim Holtz clock masks and SU inks in navy, yellow and teal ink the surface of the canvas. Allow to dry (another blast with the heat gun) This is the really messy bit!!


3. Spray with Cosmic shimmer and allow to dry again.


4. Gather Angelinas fibres in the colour of choice, add inclusions (i added embroidery thread) iron between two sheets of paper.


5. Crop the photo, put onto a card mat, with a scalloped edge (Fiskars punch) add a snap using a cropodile, and some doodling in white. Stick on top of the Angelinas fibres onto the canvas.

6. Die cut the bird using Grungeboard. Paint with paint dabbers, leave to dry (blast!!) ink the raised parts using SU navy ink. Spray with Cosmic Shimmer, leave to dry. Add pearl brads, and a MM tag.


7. Die cut the small title words (I used Sizzix Sunset) and hand cut the larger ones. Emboss, sand and ink the larger letters. Spray with cosmic shimmer, ink the edges using cut and dry foam and navy ink.

8. Stamp a journalling mat and add journalling. Add to the left of the photo, with doodling. I put the bird over the journalling block before adding my writing so none of it was obscured when i finally glued all the elements onto the canvas.


9. Stick on the bird, some bling swirls and title, (raise some letters with 3D foam)

10. Stamp around the edges of the canvas with words or phrases (I used Unity stamps for this) remember to heat blast each side before moving on, or the ink smudges.

I hope she likes it!

Tuesday, 31 March 2009

52 Questions...

This is a journalling challenge started at the beginning of the year here. At the time i decided i had enough to do already, so passed on it. However, since being off work i needed something to keep me busy, so i decided to give it a go. In a way i'm glad i didn't start from the beginning, as having 12 questions to do has made me decide to do them all in a similar way. After all, i feel the key to this is the journalling. So i have just been using my Stampin' Up ink pads to colour the tags, and various stamps to decorate them.


Some of my journalling is personal, other bits just jokey, here are a few examples....


Stamps used:

Autumn Leaves; Journalling circles, swirls,

Unity;Bird,

Stampin' Up; Office Accoutrement

QVC; Fairy

Mini alphabet stamps; Studio g

Number stamp; Papermania

Sunday, 22 March 2009

Happy Mothers Day


So to my Mum and to Kathleen my MIL a happy mothers day. This is what i made for them a few weeks ago, playing about with Unity stamps and some friendly plastic, alcohol inks and fusible fibres. Since i went to the class at Stampeezee i have no problems with FP, and enjoy making things with it. The Unity stamps seemed perfect for this little project, i just hope they like them.

I also used up a bit of free and old stash in making the cards, i seem to have got back into stamping since going to a Stampin' Up party at Sheenas a while back. I love the big ink pads they sell, the range of colours is lovely, i can see me having to pick some more up in future... but where to put them?


Kev is cooking dinner as i type, no change there really, he keeps trying to rope the kids in, but is having very little luck. So happy Mothers day to all Mums out there (including me!)

Saturday, 15 November 2008

Scrapping December...

I found myself preparing for this today by buying an 8x8 scrapbook in red. I decorated the cover using some Basic Grey Buttons (Hannahs idea) and a bit of dimensional paint. I did find myself looking at the calendar today though and wondering how i'll get it all done as December is going to be so busy! I suppose that will mean that there is plenty to put into it!!!
Got much of my pressie wrapping done last weekend, and have made most of the cards i'm going to, so now i can get back to scrapping again, which seem to have abandoned a little recently.

Sunday, 2 November 2008

Back to school :(


Well, i'm back to work tomorrow, so i don't suppose i will update as often now until Christmas. I had fun with Katie today playing with flocking powders making even more Christmas cards today, nad yester day completed a calendar for my MIL. It was great to look back at lots of the photos i have taken over the past 2 years since i had my DSLR, and feel a bit proud about some of them!

The only thing i need to do more of in the next year or so is to make sure i am occasionally in front of the lens, not always behind it!!

Sunday, 7 September 2008

Stash sort out....

I was supposed to be starting my next photo course, and needed to take some portrait shots, but it has rained so much that I have had to put it off til Sunday (hopefully!)


Instead I started to sort my stash, and I found something (surprise, surprise!!) I had forgotten I had bought. SO i spent yesterday evening making this little house, using all old stash I had almost forgotten I had bought.


The house is by Doodlebug, as are mosts of the papers, althought I did get these free in a copy of SI I bought ages ago.The only new thing i used was the cuttlebug border embossing folder, to make the little buttons for the eaves and the planter. It did take me ages to make, but I'm pleased with the result!!! And it is the first Christmas thing I have made this year.

Hope for some dry weather tomorrow!!